How to Test a Capacitor
Introduction
Capacitors are essential components in countless devices, from household appliances to industrial machinery. They store and release electrical energy to ensure smooth operation. Yet, when they fail, the consequences can be frustrating and expensive.
Understanding how to test a capacitor empowers you to diagnose issues before they escalate. This guide delivers practical, step-by-step methods using tools you likely already own. You’ll gain confidence in identifying good, bad, or failing capacitors with precision.
Whether you’re troubleshooting an air conditioner or repairing electronics, these techniques work across applications. Follow along to master how to test a capacitor with a multimeter, in-circuit checks, and HVAC-specific procedures. By the end, you’ll save time, money, and avoid unnecessary replacements.
Understanding Capacitors Before Testing
Capacitors come in various types, including electrolytic, ceramic, film, and motor start/run varieties. Each serves a unique role in stabilizing voltage and supporting motor function. Recognizing their purpose helps you test them effectively.
Testing capacitors matters because failure is a leading cause of system breakdowns. According to the U.S. Department of Energy, 80% of HVAC motor failures trace back to faulty capacitors. Early detection prevents costly compressor damage exceeding $1,200.
Common signs of capacitor failure include:
- Humming motors that refuse to start
- Swollen or leaking casings
- Burn marks or bulging tops
- Intermittent device performance
These symptoms often appear gradually, making proactive testing essential. Regular checks extend equipment life and improve energy efficiency.
Safety First: Essential Precautions
Electricity demands respect, especially with capacitors that store charge long after power is disconnected. High-voltage units in HVAC systems can deliver lethal shocks if mishandled. Always prioritize safety to protect yourself and your equipment.
Begin every test by disconnecting power at the breaker. This eliminates live current risks. Next, discharge the capacitor using a 20,000Ω, 5W resistor or an insulated screwdriver across terminals. Hold the short for at least 30 seconds.
Wear insulated gloves and safety glasses throughout the process. Use a non-contact voltage tester to confirm zero voltage before touching terminals. These habits prevent accidents and ensure accurate readings.
Pro Tip: Invest in a dedicated capacitor discharge tool for frequent testing. It’s safer and faster than improvised methods.
How to Test a Capacitor with a Multimeter (Step-by-Step)
The digital multimeter remains the most reliable and accessible tool for capacitor testing. Its capacitance mode provides direct, accurate readings. Even without this feature, resistance and voltage tests reveal critical insights.
Tools Needed
- Digital multimeter (capacitance mode ideal)
- Insulated screwdriver for discharge
- Safety gloves and eyewear
Method 1: Capacitance Mode (Most Accurate)
Remove the capacitor from the circuit when possible for isolated testing. Set your multimeter to capacitance (µF) mode. Connect probes to the correct terminals, observing polarity on electrolytic types.
The display should stabilize within seconds. Compare the reading to the value printed on the capacitor, allowing ±5-10% tolerance. A healthy capacitor falls within this range.
- Good: Reading matches spec (e.g., 35 µF ± 3.5)
- Bad: Shows 0 µF, OL (overload), or far outside tolerance
This method detects open, shorted, or degraded capacitors instantly. It’s the preferred choice for technicians and DIY users alike.
Method 2: Resistance Mode (No Capacitance Setting)
Not all multimeters include capacitance measurement. The resistance test works as a reliable alternative. Set your meter to the highest ohm range, typically 20MΩ.
Touch probes to the terminals and observe the display. A functional capacitor shows resistance climbing steadily before settling on OL (open). This indicates proper charging behavior.
- Good: Gradual rise to infinity
- Shorted: Remains low (near 0Ω)
- Open: No change from start
Repeat the test multiple times to confirm consistency. Discharge fully between attempts to reset the capacitor.
Method 3: Voltage Test
This method verifies charge retention. Briefly apply the capacitor’s rated voltage using a safe power source. Switch your multimeter to DC volts and connect probes.
The reading should match the charging voltage initially, then decrease slowly. Rapid voltage drop signals internal leakage. This test complements capacitance checks for comprehensive diagnosis.
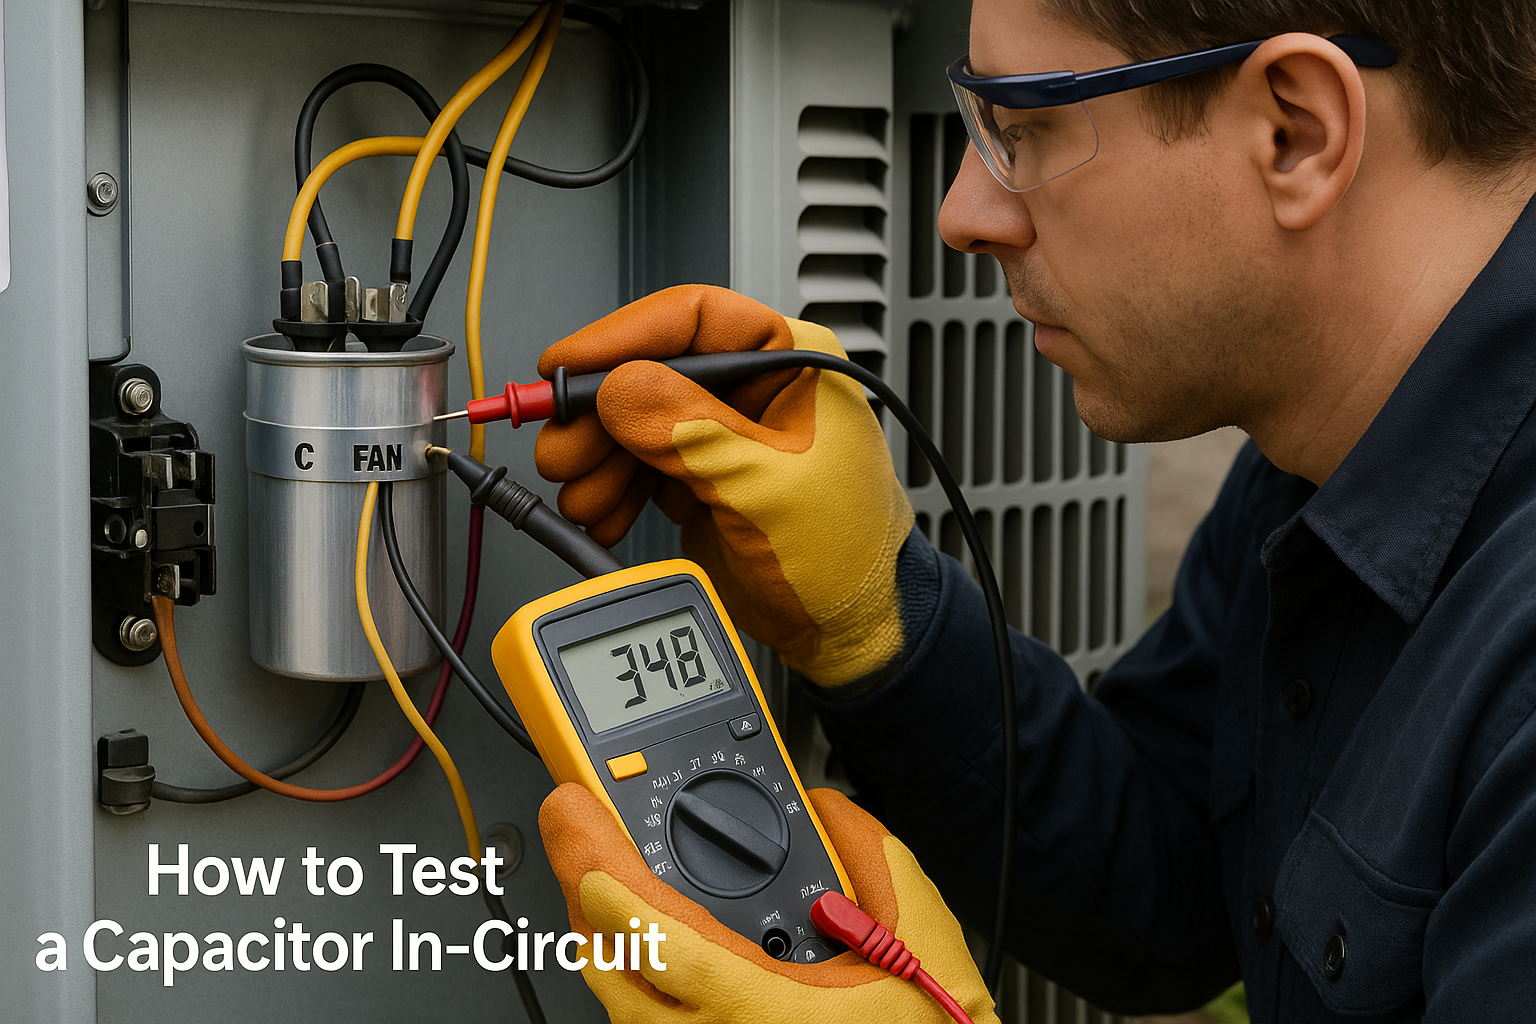
How to Test a Capacitor in Circuit (Without Removal)
In-circuit testing offers convenience when removal is difficult or time-consuming. It’s ideal for initial diagnostics in tight spaces. However, parallel components can interfere with accuracy.
Expect readings higher than the rated value due to circuit influence. A significantly lower reading suggests failure. Always follow up with an out-of-circuit test for confirmation.
In-Circuit Testing Steps
- Power off and discharge the entire system.
- Set multimeter to capacitance if supported in-circuit.
- Probe terminals carefully.
- Note elevated readings as normal.
- Flag values well below spec.
This approach saves time during troubleshooting. Use it to narrow down suspects before full disassembly.
How to Test a Capacitor HVAC Systems (Run & Start Types)
HVAC capacitors endure heat, humidity, and constant cycling. Run capacitors support ongoing motor operation, while start capacitors provide initial torque. Dual-run types combine both functions in one unit.
Locate the capacitor near the condenser unit, typically in a gray or silver canister. Photograph wiring connections before disconnection. This prevents reinstallation errors.
Discharge using a resistor tool for maximum safety. Test each section independently:
- C to HERM (compressor terminal)
- C to FAN (fan motor terminal)
Industry tolerance allows ±6% deviation. A 45 µF capacitor should read between 42.3 and 47.7 µF.
Real-World Example
A technician tested a 45/5 µF dual-run capacitor. The compressor section read 38 µF—technically in spec but borderline. The unit struggled with hard starts. Replacing it restored smooth operation and prevented compressor failure costing over $2,800.
Annual testing during spring maintenance catches these issues early. Most HVAC capacitors last 5–10 years under normal conditions.
How to Test a Capacitor with a Voltmeter
Analog voltmeters provide a visual alternative when digital tools are unavailable. The needle deflection test demonstrates charge and discharge behavior clearly.
Analog Needle Deflection Method
- Set to the highest DC volt range.
- Charge the capacitor briefly to its rated voltage.
- Connect probes and watch the needle.
- It should jump sharply then fall gradually.
- No movement = open circuit.
- Stays pinned = shorted.
This classic method remains effective in field conditions. It requires no special settings beyond voltage range selection.
Comparison Table: Testing Methods
| Method | Accuracy | Tools Needed | Best For |
| Capacitance Mode | 95%+ | Digital multimeter | Precision diagnosis |
| Resistance Mode | 85% | Any multimeter | Universal quick checks |
| In-Circuit | 70% | Multimeter | Initial screening |
| Voltmeter Deflection | 75% | Analog voltmeter | Visual confirmation |
Choose based on available tools and required accuracy. Capacitance mode leads for reliability.
Advanced Testing Tools
Dedicated capacitor analyzers elevate diagnostic capability. Devices like the Extech CT70 measure ESR (Equivalent Series Resistance) and leakage current. These reveal degradation invisible to standard multimeters.
High ESR indicates internal breakdown even when capacitance reads normal. Most quality capacitors maintain ESR below 1Ω. Values above 5Ω signal impending failure.
Microwave oven capacitors demand specialized high-voltage testers. Their 1,000V+ ratings make standard multimeters unsafe and inaccurate.
Common Mistakes to Avoid
Skipping discharge is the most dangerous error. Residual charge can cause severe injury. Always verify zero voltage twice.
Ignoring polarity damages electrolytic capacitors during testing. Reverse connection may cause explosion or permanent failure. Mark terminals clearly before removal.
Trusting in-circuit readings alone leads to misdiagnosis. Parallel components distort results. Confirm suspicious findings with isolated testing.
Auto-ranging multimeters can confuse beginners. Manually select the appropriate range for resistance and voltage tests. This ensures stable, readable results.
Troubleshooting Beyond Testing
A capacitor may test within spec yet cause system issues. Check wiring continuity and motor windings next. Corroded connections mimic capacitor failure.
Contactor points wear over time, creating high resistance. Clean or replace pitted contacts. These often resolve intermittent starting problems.
Age remains a reliable failure predictor. Replace HVAC capacitors every 7–10 years preventively. The cost ($20–$50) pales compared to compressor replacement.
DIY vs. Professional Testing
| Scenario | DIY Safe? | Recommendation |
| Window AC unit | Yes | Follow this guide |
| Central HVAC system | Caution | Professional if over 10 years old |
| Microwave oven capacitor | NO | High voltage risk – Call expert |
DIY testing suits low-voltage, accessible components. High-voltage systems warrant professional expertise and specialized tools.
Frequently Asked Questions
Can I test a capacitor without a multimeter?
Yes, though less reliably. The spark test works in emergencies:
- Charge briefly with known voltage
- Short terminals with insulated tool
- Strong spark = good storage
- Weak or none = failed
How often should HVAC capacitors be tested?
Test annually during spring tune-up. Replace every 5–7 years as preventive maintenance. Heat accelerates degradation.
What’s the difference between MFD and µF?
They’re identical units. MFD (microfarad) is an older abbreviation; µF is the modern standard. Both measure capacitance.
Conclusion
Mastering how to test a capacitor fundamentally shifts electrical troubleshooting from frustrating guesswork to a precise, repeatable science.
With nothing more than a digital multimeter and a few minutes, you can confidently determine whether a capacitor is healthy, failing, or completely dead—preventing unnecessary part replacements and avoiding costly system damage.
The capacitance mode test stands as the gold standard, delivering 95%+ accuracy by directly comparing measured microfarads (µF) to the component’s rated value within a ±5–10% tolerance window.
When this function isn’t available, the resistance mode reliably reveals charging behavior:
a steady climb to infinity (OL) confirms functionality, while a flatline near zero ohms signals a short. Complement these with the voltage retention test—where a good capacitor holds charge briefly before a slow discharge—to expose hidden leakage issues that capacitance alone might miss.
Stay in touch to get more updates & alerts on sosomodapks! Thank you